Using SNC (Secure Network Connection)
General notes
The cryptographic libraries delivered by SAP are only available as 64-bit software. Therefore you have to use the 64-bit Scansor version to support SNC connections. Since Scansor depends on SAP .NET Connector and different ODBC drivers, these components also have to be installed as 64-bit versions. See here how to check which version you have installed.
Since the SAP Cryptographic Library is a licensed software and not available in some countries, the Scansor installer cannot deliver the necessary files. You have to download and install the SAPCryptoLib components yourself.
Prerequisites
There are some steps to be done before you can use SNC. Please follow the steps attentively.
Monitoring Server (PRTG Probe)
Install SAP Cryptolib
To download the SAP Cryptolib, login to SAP Software Download Center and follow the path Installation & Upgrades > By Category > Additional Componentes > SAPCRYPTOLIB > COMMONCRYPTOLIB 8. Then select WINDOWS ON X64 64BIT and download the latest patch level.
You'll also find the SAPCAR tool in the Additional Components section. Please also use the latest patch level of it.
Extract it to the Scansor installation folder (C:\Program Files (x86)\PRTG Network Monitor\Custom Sensors\EXEXML) using the SAP extraction tool SAPCAR:
SAPCAR.exe -xf SAPCRYPROLIBP_<version>.SAR
It’s also possible to extract the software to another folder. If you do so, you have to adjust the path to sapcrypto.dll in the Profiler settings as described here.
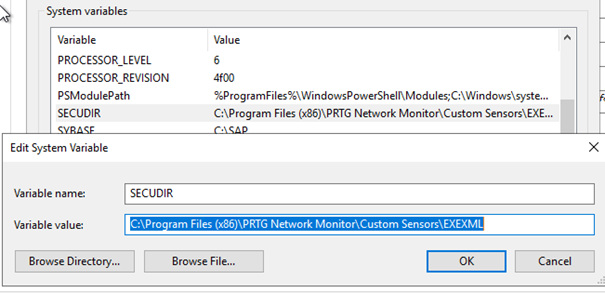
Set variable SECUDIR
To set the environment variable SECUDIR you have two options:
- Set the variable only for the probe service in the registry
- Set the variable as an environment variable for the system
Using the environment variable option enables you to also run the sensors on the command line using SNC for troubleshooting.
- System environment variable
- Registry
Set a new system variable SECUDIR with the value holding the path to your SAPCryptoLib installation (usually C:\Program Files (x86)\PRTG Network Monitor\Custom Sensors\EXEXML):
Use the file SECUDIR.reg in the EXEXML folder or download it here to install the necessary registry key for the PRTG Probe Service. After applying the keys, please check the path HKEY_LOCAL_MACHINE\SYSTEM\CurrentControlSet\Services\PRTGProbeService if the value of the entry Environment has the correct path to your PRTG installation EXEXML folder where Scansor is installed.
To make the system variable take effect, please restart the PRTG Probe Service!
Create credentials for SYSTEM user
Scansor delivers a predefined PSE (Personal Security Environment) which can be used to store trusted certificates. The Scansor.pse file is also located in the Scansor installation folder (C:\Program Files (x86)\PRTG Network Monitor\Custom Sensors\EXEXML).
The Scansor.pse file is protected by a PIN/Passphrase:
Scansor4ev3r$
It's strongly recommended to change the PIN of Scansor.pse if you imported an own private key and certificate.
You can change the PIN with the following command:
sapgenpse.exe seclogin -chpin -p Scansor.pse -x Scansor4ev3r$ -xn <new_pin>
Now you have to create a credentials file for the SYSTEM user to open the PSE file during the execution of a sensor. Use the following command to create the credentials file (cred_v2):
sapgenpse.exe seclogin -p Scansor.pse -O SYSTEM
You can also add the credentials for your administration user to prevent typing the PIN every time you make modifications to the PSE file. Just run the same command without -O option when you are logged in with your administration user:
sapgenpse.exe seclogin -p Scansor.pse
ABAP / S4 system
Import Scansor certificate
Open transaction STRUST and doubleclick SNC SAPCryptolib in the tree:
Click the import button in the right panel and choose the Scansor.crt file which has been written to the installation directory (C:\Program Files (x86)\PRTG Network Monitor\Custom Sensors\EXEXML) during the installation:
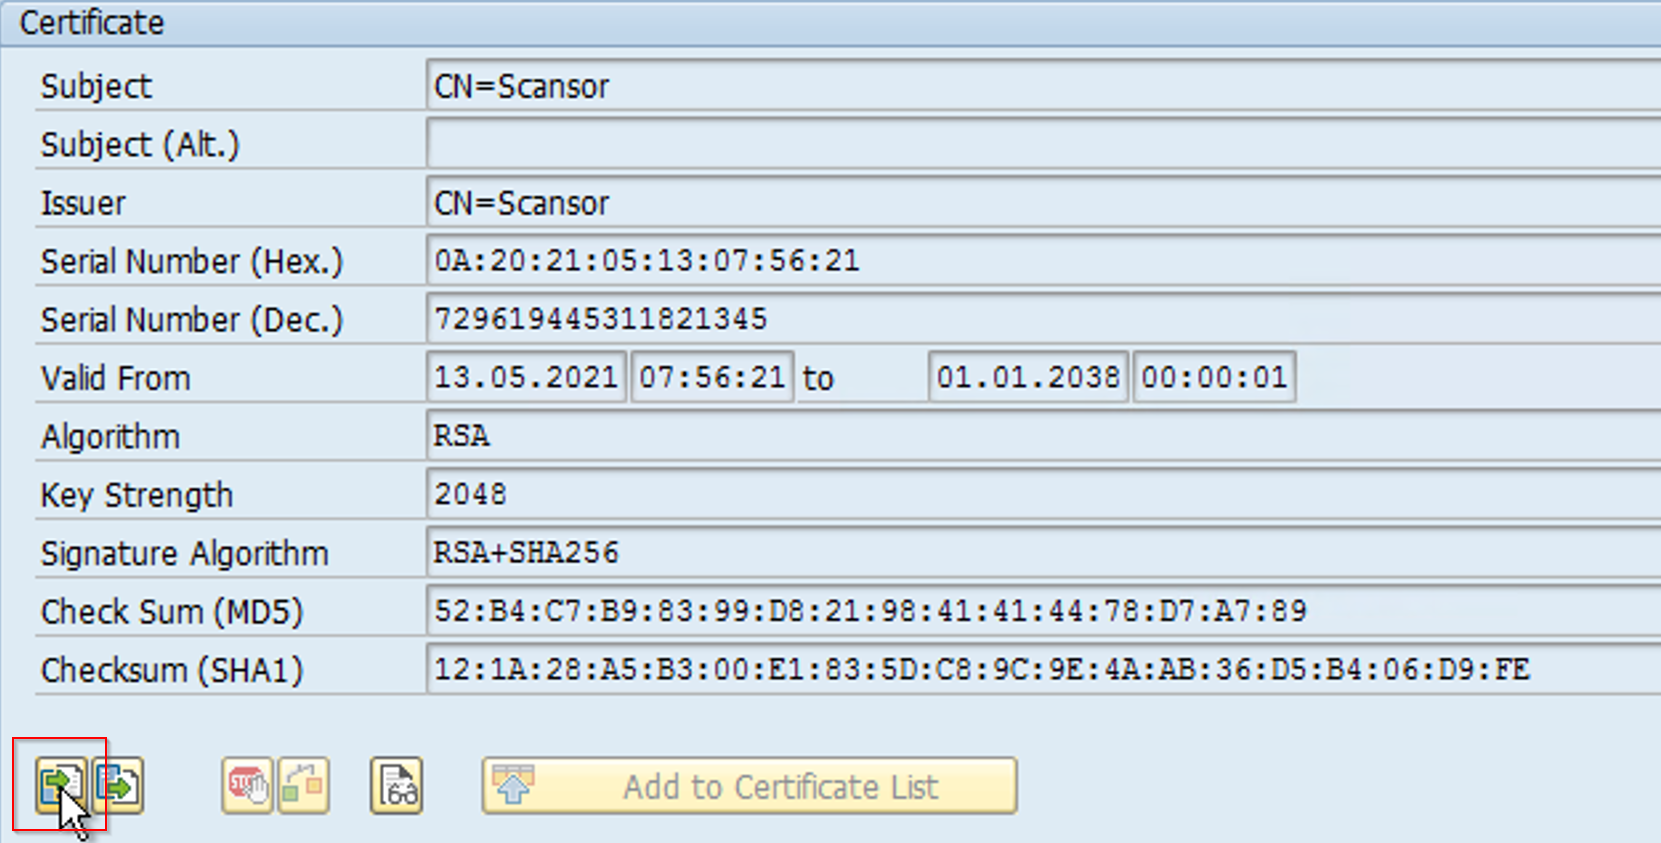
Add to Certificate List. (Only available in edit mode.)
You can also use an officially signed certificate for Scansor if your company’s security policies don’t allow self-signed certificates. In this case import the issuer certificate of your signed certificate into the trusted list of your ABAP system. Maybe your company’s issuer certificate is already in the trusted list.
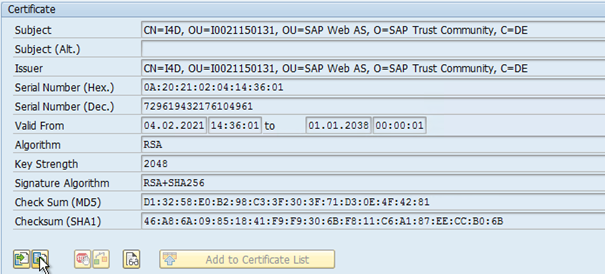
Export ABAP SNC certificate
If you use a self-signed certificate as your SNC SAPCryptolib certificate, export the certificate by double-clicking the certificate and save it to a .crt file:

Import ABAP SNC certificate to Scansor.pse
To import an ABAP SNC certificate or it’s issuer certificate execute the following steps:
Start cmd.exe as Administrator and change directory to the Scansor installation folder:
cd "C:\Program Files (x86)\PRTG Network Monitor\Custom Sensors\EXEXML"
Type the following command to import a certificate:
sapgenpse.exe maintain_pk -a <path to your certificate> -p Scansor.pse
Configure SNC in your system profile
In the Profiler GUI, select the profile for which you want to enable SNC.
Activate the checkbox Enable SNC and type the SNC name of your ABAP system in the SNC Name field:

Troubleshooting
Setting up SNC requires much configuration steps. Sometimes we miss a step or do something wrong. Therefore we listed a few common errors and a hint how to get to the solution.
Since the SNC libraries depend on the environment variable SECUDIR, running a sensor on command line can produce an error while the PRTG probe can run the sensor successfully and vice versa.
| Error message | Possible solution |
|---|---|
No credentials were supplied 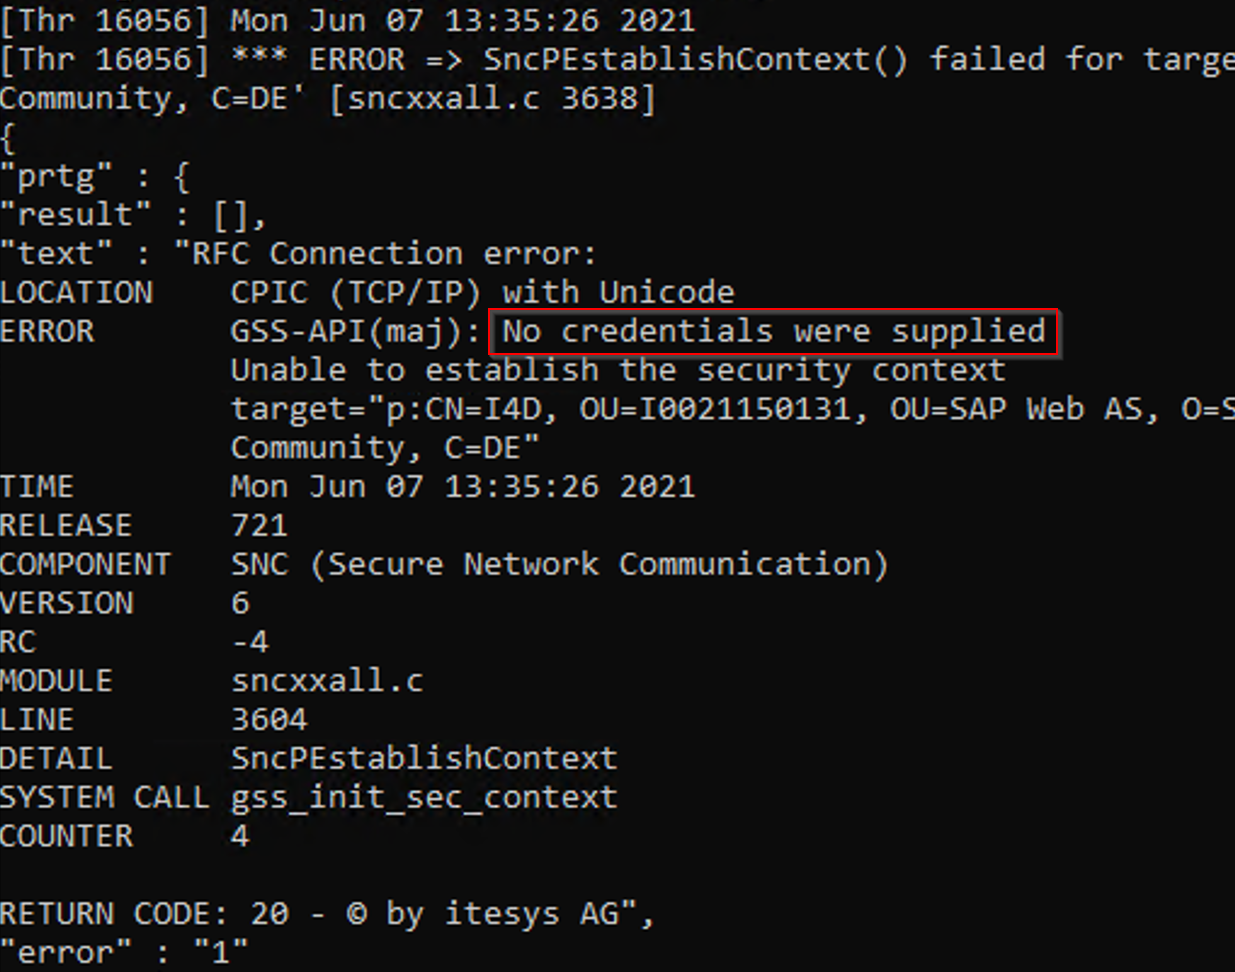 | |
.\sapcrypto.dll is not a valid Win32 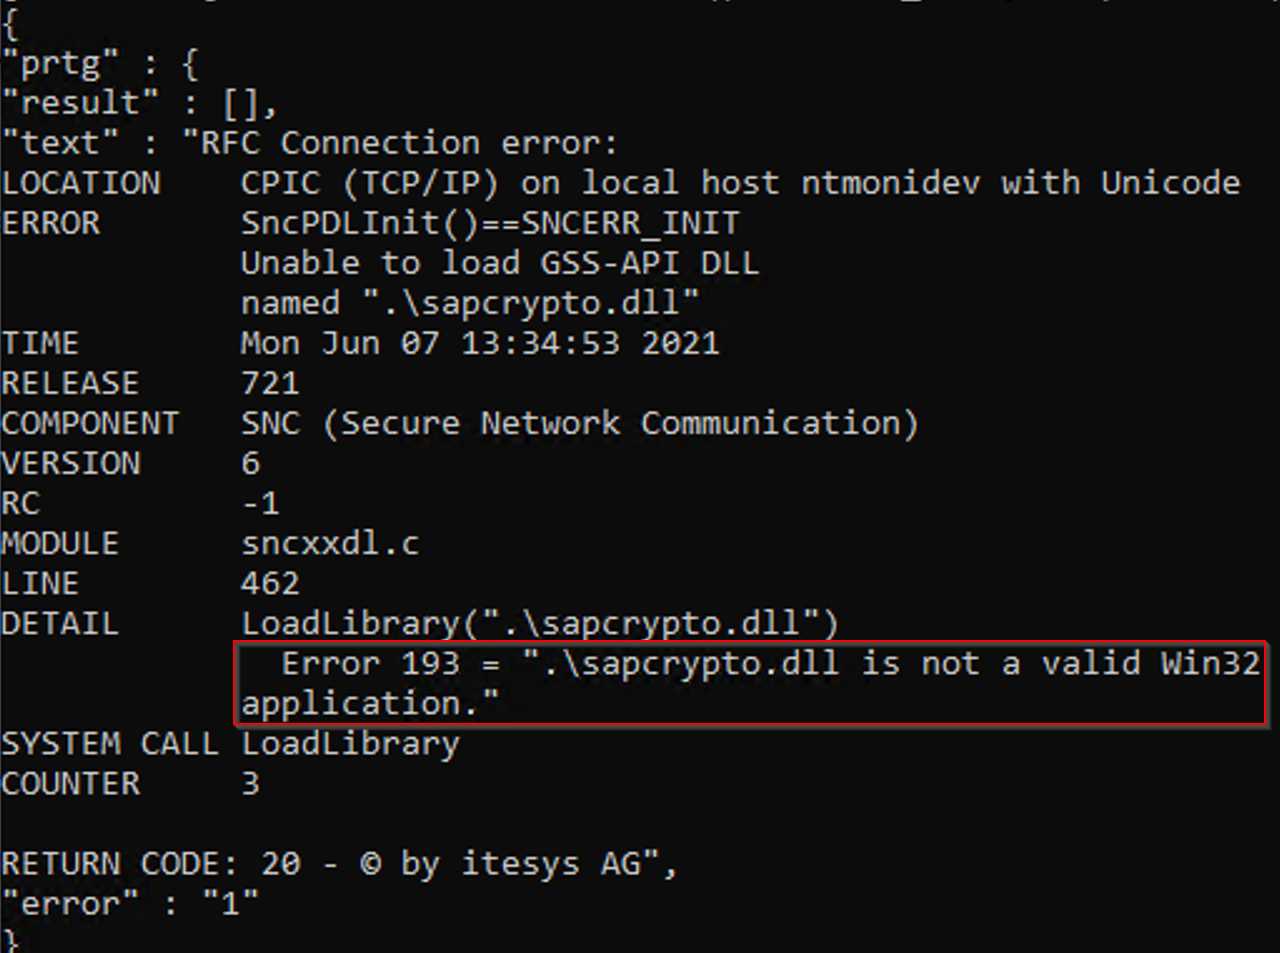 |
|
Actual server name differs from requested one 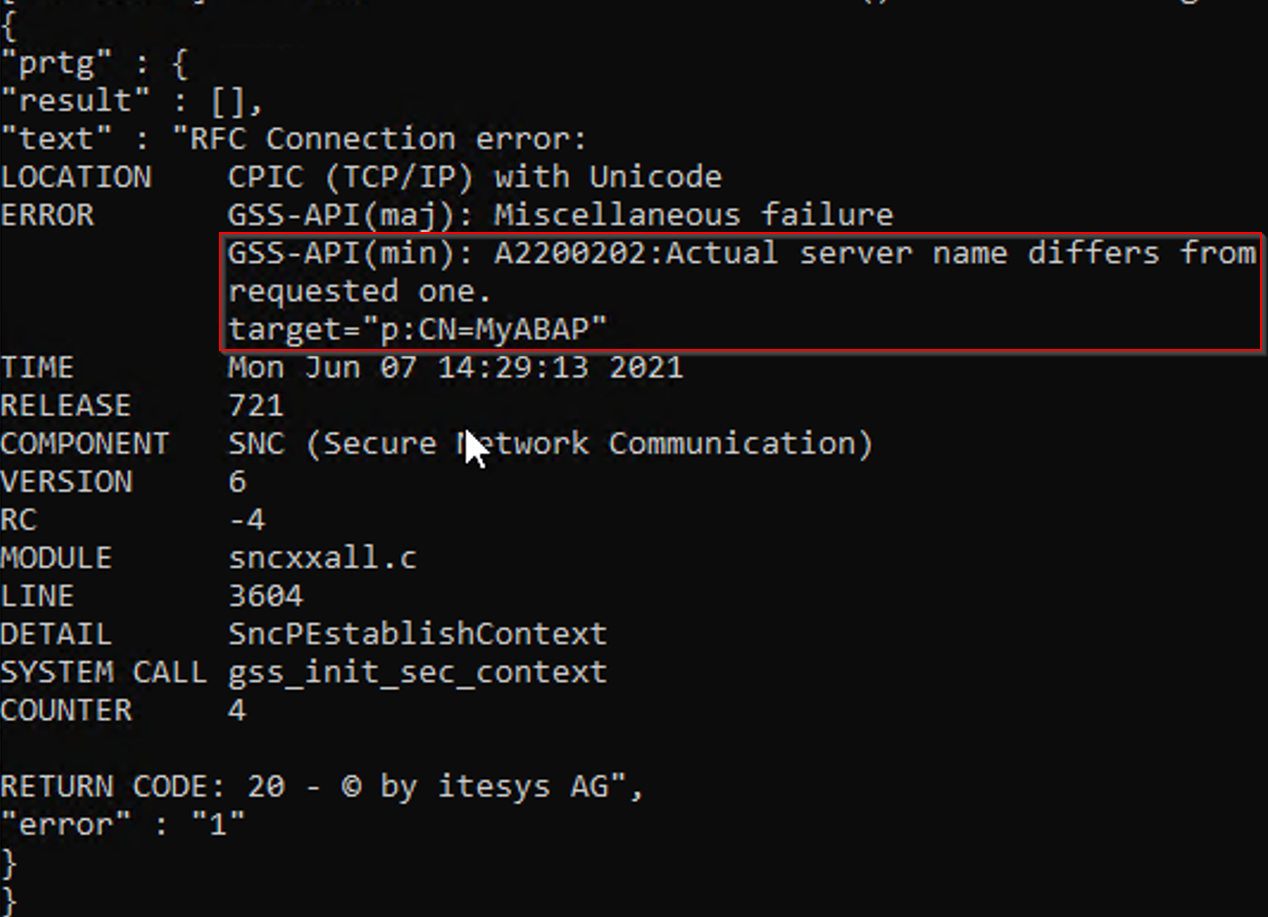 |
|
